Examples
You can find every data files used in examples in examples/data.
Automatic Classification
$ cd examples/classification
$ python main.py
First step, import several needed packages.
import os

import joblib
import pandas as pd
from sklearn.model_selection import KFold

from autoflow import AutoFlowClassifier
Second step, load data from CSV.
train_df = pd.read_csv("../data/train_classification.csv")
test_df = pd.read_csv("../data/test_classification.csv")
Third step, define a AutoFlowClassifier.
- Here are some key parameters:
initial_runsare totally random search, to provide experience for SMAC algorithm.run_limitis the maximum number of runs.n_jobsdefines how many search processes are started.included_classifiersrestrict the search space . In herelightgbmis the only classifier that needs to be selected. You can useincluded_classifiers=["lightgbm", "random_forest"]to define other selected classifiers. You can find all classifiers AutoFlow supported inautoflow.hdl.hdl_constructor.HDL_Constructorper_run_time_limitrestrict the run time. if a trial during 60 seconds, it is expired, should be killed.
trained_pipeline = AutoFlowClassifier(initial_runs=5, run_limit=10, n_jobs=1, included_classifiers=["lightgbm"],
                                       per_run_time_limit=60)
Fifth step, define columns descriptions, you can find .You can find the full definition in autoflow.manager.data_manager.DataManager .
- Here are some columns descriptions:
idis a column name means unique descriptor of each rows.targetcolumn in the dataset is what your model will learn to predict.ignoreis some columns which contains irrelevant information.
column_descriptions = {
    "id": "PassengerId",
    "target": "Survived",
    "ignore": "Name"
}
Sixth step, auto do fitting. you can find full document in autoflow.estimator.base.AutoFlowEstimator.fit() .
Passing data params train_df, test_df and column_descriptions to classifier.
If fit_ensemble_params is “auto” or True, the top 10 models will be integrated by stacking ensemble.
splitter is train-valid-dataset splitter,now is set to KFold(3, True, 42) to do 3-Fold Cross-Validation.
You can pass this param defined by yourself or other package, like sklearn.model_selection.StratifiedKFold.
trained_pipeline.fit(
    X_train=train_df, X_test=test_df, column_descriptions=column_descriptions,
    fit_ensemble_params=False,
    splitter=KFold(n_splits=3, shuffle=True, random_state=42),
)
Finally, the best model will be serialize and store in local file system for subsequent use.
joblib.dump(trained_pipeline, "autoflow_classification.bz2")
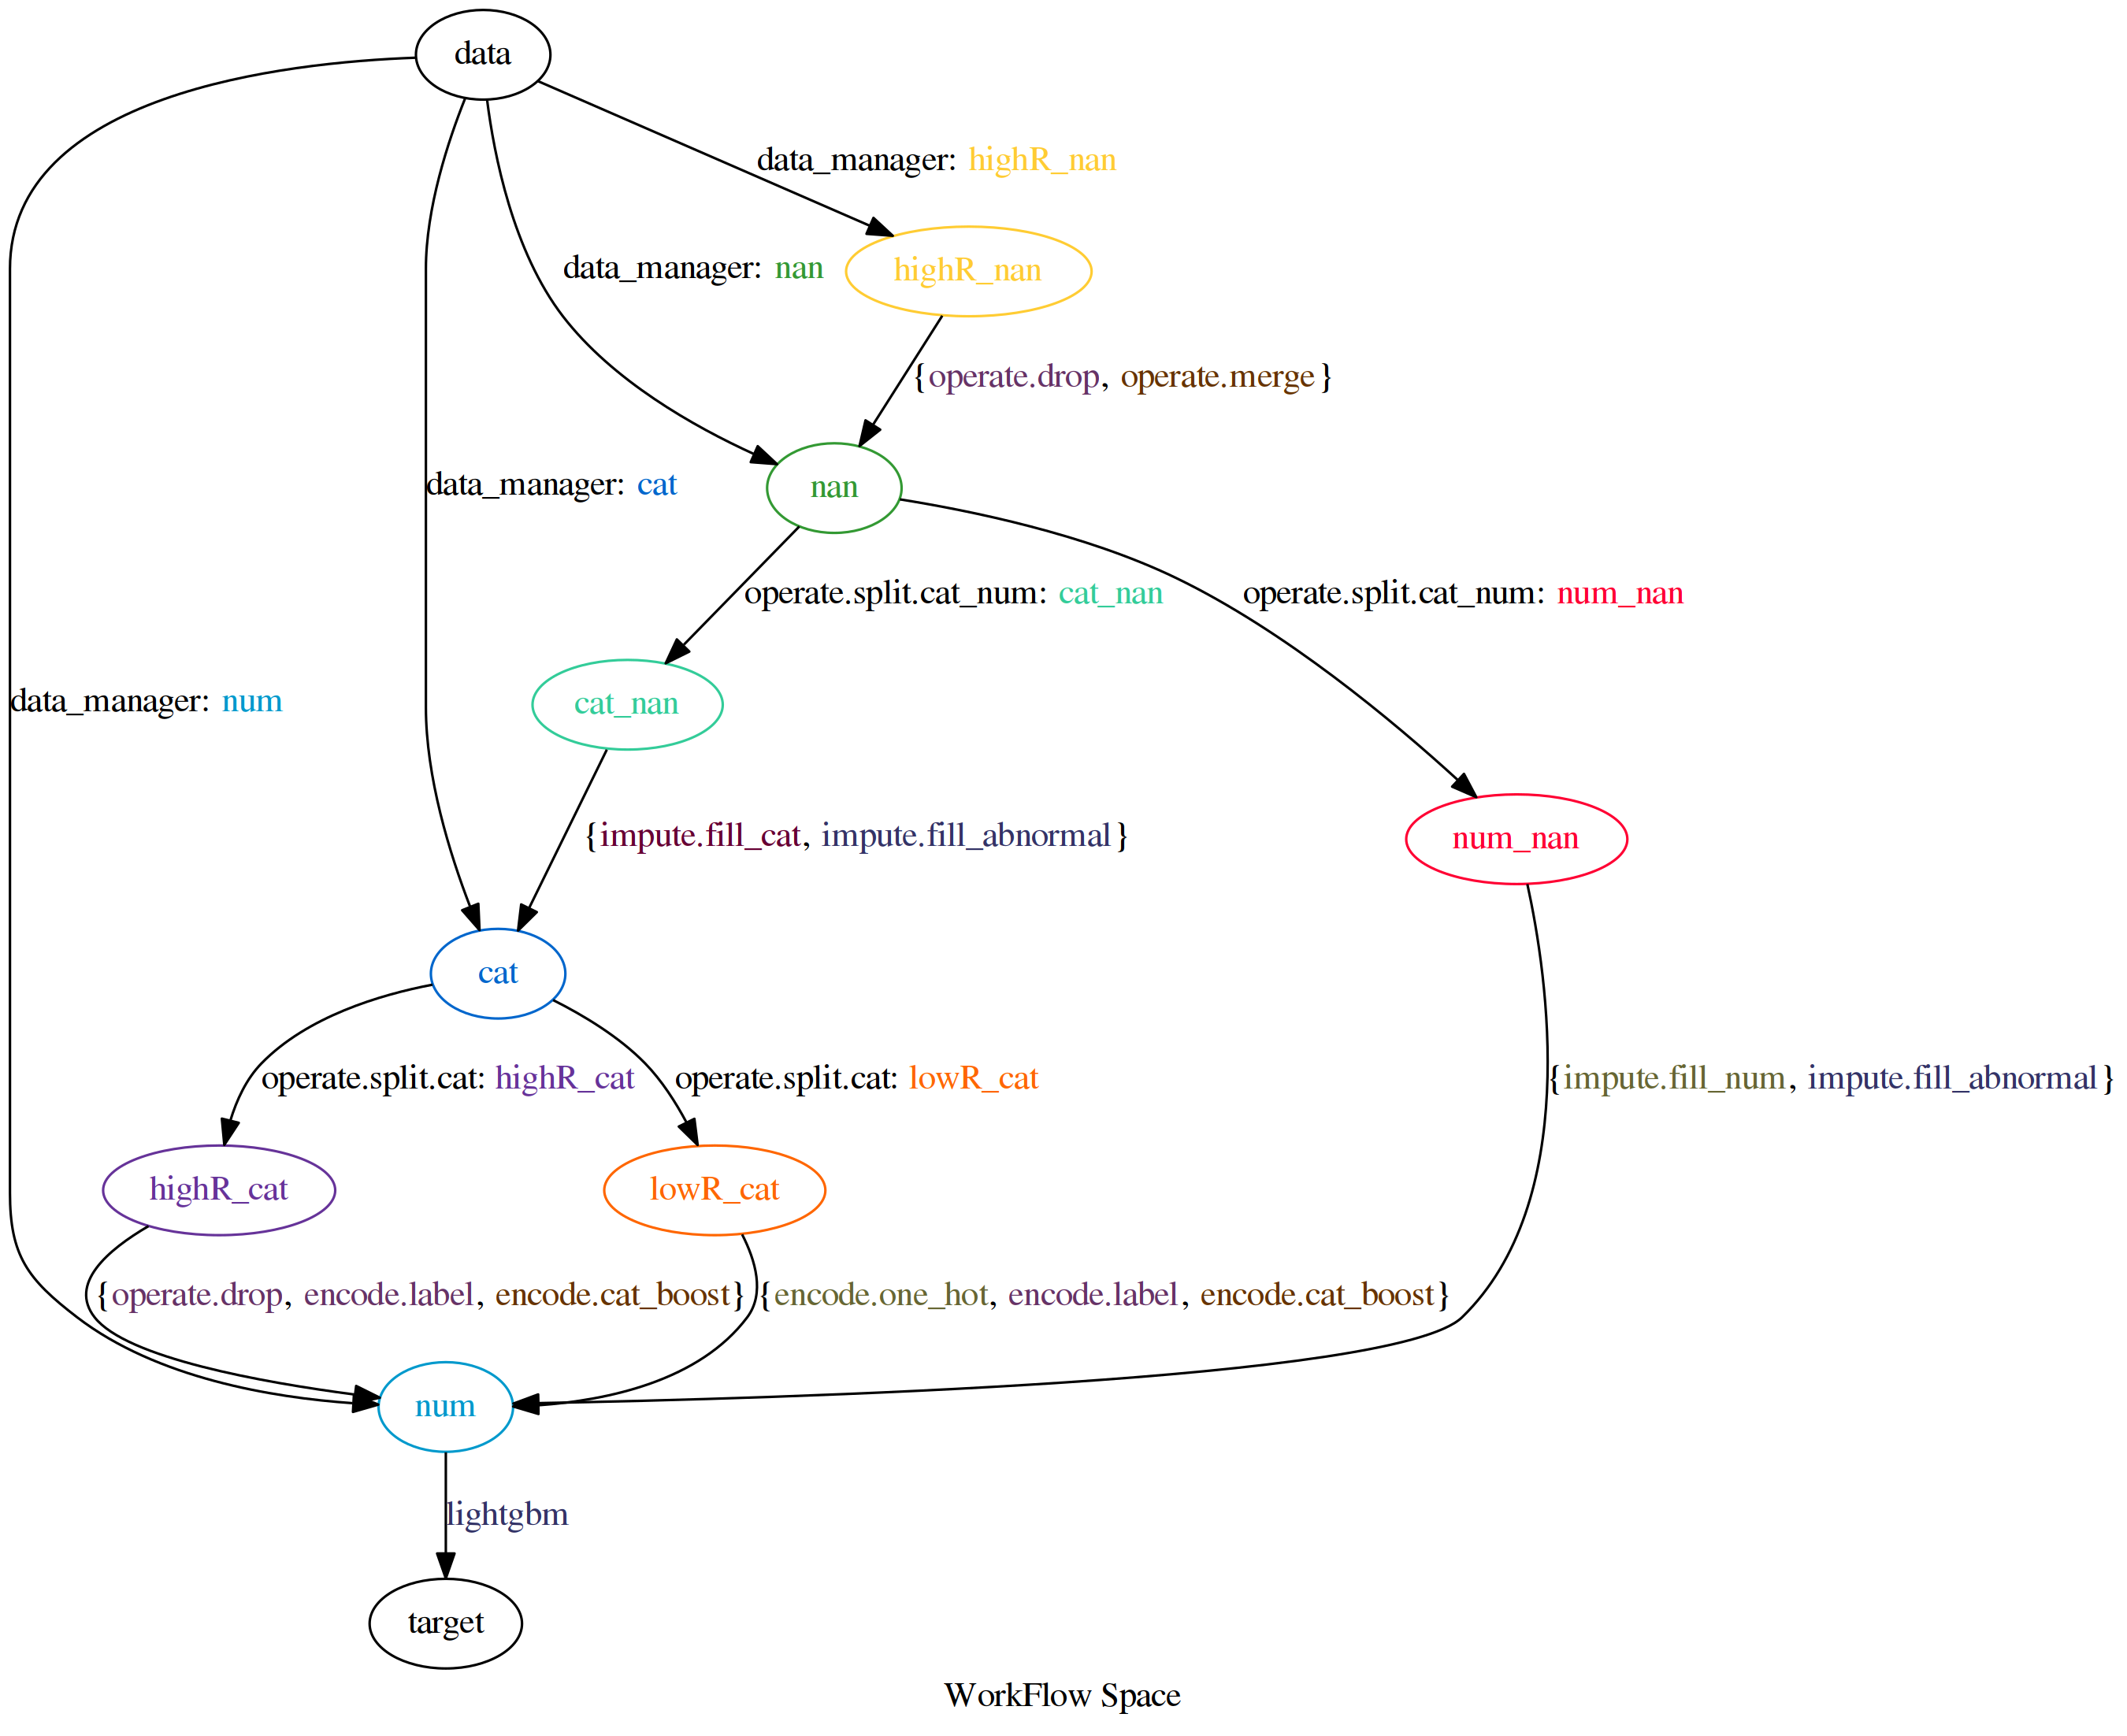
Additionally, if you want to see what the workflow AutoFlow is searching,
you can use autoflow.hdl.hdl_constructor.HDL_Constructor#draw_workflow_space() to visualize.
>>> hdl_constructor = trained_pipeline.hdl_constructors[0]
>>> hdl_constructor.draw_workflow_space()
For Reproducibility purpose, you can load serialized model from file system.
predict_pipeline = joblib.load("autoflow_classification.bz2")
result = predict_pipeline.predict(test_df)
OK, you can do automatically classify now.
Automatic Regression
$ cd examples/regression
$ python main.py
import os

import joblib
import numpy as np
import pandas as pd
from sklearn.model_selection import KFold

from autoflow import AutoFlowRegressor

train_df = pd.read_csv("../data/train_regression.csv")
train_df.replace("NA", np.nan, inplace=True)
test_df = pd.read_csv("../data/test_regression.csv")
test_df.replace("NA", np.nan, inplace=True)
trained_pipeline = AutoFlowRegressor(initial_runs=5, run_limit=10, n_jobs=1, included_regressors=["lightgbm"],
                                      per_run_time_limit=60)
column_descriptions = {
    "id": "Id",
    "target": "SalePrice",
}
if not os.path.exists("autoflow_regression.bz2"):
    trained_pipeline.fit(
        X_train=train_df, X_test=test_df, column_descriptions=column_descriptions,
        splitter=KFold(n_splits=3, shuffle=True, random_state=42), fit_ensemble_params=False
    )
    # if you want to see the workflow AutoFlow is searching, you can use `draw_workflow_space` to visualize
    hdl_constructor = trained_pipeline.hdl_constructors[0]
    hdl_constructor.draw_workflow_space()
    joblib.dump(trained_pipeline, "autoflow_regression.bz2")
predict_pipeline = joblib.load("autoflow_regression.bz2")
result = predict_pipeline.predict(test_df)
print(result)
Phased Search
phased search allowed you to search the best pipeline(workflow) step by step.
For example, if you want do feature selection, there are several variable you should take into consideration.
If you search these hyper-parameters in one search task, the search-space can be very huge.
Without loss of generality, we hypothesis the search-space contains two hyper-parameters : \(A\) and \(B\) , if \(A\) and \(B\) are both categorical-type hyper-param, \(A\) have \(M\) choices, \(B\) have \(N\) choices, the total hyper-parameters space have \({N}\times{M}\) choices, time complexity is \({O}({A}\times{B})\).
But if we greedily fine tune \(A\) in the first, and then fine tune \(B\) on the optimal \(A\), we can we can reduce time complexity to \(O({A} + {B})\) .
This is a very simple greedy thought, but it is very powerful and make sense if there is little correlation between each variable.
In AutoFlow, we support such search method by phased search, you should define a list of autoflow.hdl.hdl_constructor.HDL_Constructor and a list of
autoflow.tuner.Tuner, and AutoFlow will run each hdl_constructor and tuner .
After finish one of phases, the best configuration will be extracted, and passing the intersted super parameter into the next HDL to cover placeholder.
Back to feature selection example, there are almost two kinds of hyper-parameters: feature selection algorithm and
feature selection ratio.
In the first step, we should keep feature selection ratio is same and change feature selection algorithm.
DAG_workflow={  # There are 4 algorithms to choice
    "num->selected": [
        {"_name": "select.from_model_clf", "_select_percent": 80},
        {"_name": "select.rfe_clf", "_select_percent": 80},
    ],
    "selected->target": {"_name": "logistic_regression", "_vanilla": True}
    # _vanilla means don't update hyper-params from hdl_bank to keep
    # there are no hyper-params in classifier.
}
In second step, we should choose the best feature selection algorithm searched from first step and to find optimal
feature selection ratio.
DAG_workflow={
# selector algorithm is set to "<placeholder>",
# means this variable will use the optimal value on the same position in the previous
# search will be selected
    "num->selected": {"_name": "<placeholder>",
                 "_select_percent": {"_type": "quniform", "_value": [1, 100, 0.5],
                                     "_default": 80}},
    # instead of fixed "_select_percent" hyper-param, in this phase it will be fine tuned.
    "selected->target": {"_name": "logistic_regression", "_vanilla": True}
}
Hear is the complete code
$ cd examples
$ python phased_search.py
import pandas as pd

from autoflow.estimator.base import AutoFlowEstimator
from autoflow.hdl.hdl_constructor import HDL_Constructor
from autoflow.tuner import Tuner

df_train = pd.read_csv("./data/train_classification.csv")

hdl_constructors = [
    HDL_Constructor(
        DAG_workflow={
            "nan->{highR=highR_nan,lowR=lowR_nan}": "operate.split.nan",
            "lowR_nan->nan": "impute.fill_abnormal",
            "highR_nan->nan": "operate.drop",
            "all->{cat_name=cat,num_name=num}": "operate.split.cat_num",
            "cat->num": "encode.label",
            "num->selected": [
                {"_name": "select.from_model_clf", "_select_percent": 80},
                {"_name": "select.rfe_clf", "_select_percent": 80},
            ],
            "selected->target": {"_name": "logistic_regression", "_vanilla": True}
        }
    ),
    HDL_Constructor(
        DAG_workflow={
            "nan->{highR=highR_nan,lowR=lowR_nan}": "operate.split.nan",
            "lowR_nan->nan": "impute.fill_abnormal",
            "highR_nan->nan": "operate.drop",
            "all->{cat_name=cat,num_name=num}": "operate.split.cat_num",
            "cat->num": "encode.label",
            "num->selected": {"_name": "<placeholder>",
                         "_select_percent": {"_type": "quniform", "_value": [1, 100, 0.5],
                                             "_default": 80}},
            "selected->target": {"_name": "logistic_regression", "_vanilla": True}
        }
    ),
]

tuners = [
    Tuner(
        run_limit=-1,
        search_method="grid",
        n_jobs=3,
        debug=True
    ),
    Tuner(
        run_limit=50,
        initial_runs=10,
        search_method="smac",
        n_jobs=3,
        debug=True
    ),
]
autoflow_pipeline = AutoFlowEstimator(tuners, hdl_constructors)
column_descriptions = {
    "id": "PassengerId",
    "target": "Survived",
    "ignore": "Name"
}

autoflow_pipeline.fit(
    X_train=df_train, column_descriptions=column_descriptions
)
Series connect two or more algorithms in single edge
As you can see in Work Flow, edge represents preprocessing or estimating algorithms in AutoFlow framework.
In the process of algorithm development, data scientists will series connect two or more algorithms to use according to their knowledge.
For example, some algorithms need scaling ,some not. Data scientists have summed up a table based on their experience showed below:
Algorithm Name |
Need Scaling |
|---|---|
SVM, KNN, PCA, K-Means, Linear Regression, Logistic Regression, Linear Discriminant Analysis |
Y |
Naive Bayes, Tree-Based models |
N |
If we not only want to trial algorithms that don’t need scaling like Naive Bayes and Tree-Based models,
but also want trial scaling-needed algorithm like SVM, KNN and LR, How can we do ?
The answer is very esay, what you should do is only connect two or more algorithms’ name by a separator "|", like this:
trained_pipeline = AutoFlowClassifier(
    initial_runs=12, run_limit=12, n_jobs=3,
    included_classifiers=[
        "scale.standardize|svc", "scale.standardize|knn", "scale.standardize|logistic_regression",
        "gaussian_nb", "extra_trees", "lightgbm"
    ],
)
"scale.standardize|svc" means do scale.standardize firstly, and do svc as a classifier secondly.
Store your data in remote
If you’re using machines that are distributed in different places, storage system will be a big problem. You must want to store your search records in single database, store your model persistent file in single file-system.
Although the default option for AutoFlow is the local file system and local database (sqlite), AutoFlow also support common relational-database like PostgreSQL and MySQL . Network File System like HDFS is also supported by AutoFlow.
In this example, you will learn how to use PostgreSQL and HDFS to store your search records and model persistent file.
Install PostgreSQL
You can find many pages on Google that teach you how to install PostgreSQL, but as a ML practitioner,
install by docker or conda maybe a good and convenient choice.
Install by Docker
$ docker pull postgres:9.6
$ docker volume create pgdata
$ docker run -it --rm -v pgdata:/var/lib/postgresql/data -p 5432:5432 -e POSTGRES_PASSWORD=000  postgres:9.6
$ ls /var/lib/docker/volumes/pgdata
  _data
Install by Conda
$ conda create -n pg -y
$ conda activate pg
$ conda install -c conda-forge postgresql -y
$ pg_ctl -D /home/tqc/miniconda3/envs/pg/var/postgres initdb
$ pg_ctl -D /home/tqc/miniconda3/envs/pg/var/postgres -l logfile start
$ psql postgres
Install HDFS
After downloading hadoop from official website , move and uncompress the hadoop fold to
/usr/local/hadoop.
You should also install java if your computer haven’t java environment.
You should modify following file:
hadoop/etc/hadoop/hdfs-site.xml
<?xml version="1.0" encoding="UTF-8"?>
<?xml-stylesheet type="text/xsl" href="configuration.xsl"?>
<configuration>
    <property>
        <name>dfs.replication</name>
        <value>1</value>
    </property>
    <property>
        <name>dfs.namenode.name.dir</name>
        <value>file:/usr/local/hadoop/tmp/dfs/name</value>
    </property>
    <property>
        <name>dfs.datanode.data.dir</name>
        <value>file:/usr/local/hadoop/tmp/dfs/data</value>
    </property>
    <property>
        <name>dfs.permissions</name>
        <value>false</value>
    </property>
    <property>
        <name>dfs.http.address</name>
        <value>0.0.0.0:50070</value>
    </property>
</configuration>
hadoop/etc/hadoop/hadoop-env.sh
export JAVA_HOME="/usr/lib/jvm/java-8-openjdk-amd64"
hadoop/etc/hadoop/core-site.sh
<?xml version="1.0" encoding="UTF-8"?>
<?xml-stylesheet type="text/xsl" href="configuration.xsl"?>
<configuration>
  <property>
    <name>hadoop.tmp.dir</name>
    <value>file:/usr/local/hadoop/tmp</value>
    <description>Abase for other temporary directories.</description>
  </property>
  <property>
    <name>fs.defaultFS</name>
    <value>hdfs://0.0.0.0:9000</value>
  </property>
</configuration>
hadoop/etc/hadoop/yarn-site.sh
<?xml version="1.0"?>
<?xml-stylesheet type="text/xsl" href="configuration.xsl"?>
<configuration>
  <property>
    <name>yarn.resourcemanager.hostname</name>
    <value>localhost</value>
  </property>
  <property>
    <name>yarn.nodemanager.aux-services</name>
    <value>mapreduce_shuffle</value>
  </property>
  <property>
    <name>yarn.application.classpath</name>
    <value>/usr/local/hadoop/etc/hadoop:/usr/local/hadoop/share/hadoop/common/lib/*:/usr/local/hadoop/share/hadoop/common/*:/usr/local/hadoop/share/hadoop/hdfs:/usr/local/hadoop/share/hadoop/hdfs/lib/*:/usr/local/hadoop/share/hadoop/hdfs/*:/usr/local/hadoop/share/hadoop/mapreduce/lib/*:/usr/local/hadoop/share/hadoop/mapreduce/*:/usr/local/hadoop/share/hadoop/yarn:/usr/local/hadoop/share/hadoop/yarn/lib/*:/usr/local/hadoop/share/hadoop/yarn/*</value>
  </property>
</configuration>
hadoop/etc/hadoop/workers
(Pseudo distributed mode)
localhost
hadoop/etc/hadoop/mapred-site.xml
<?xml version="1.0"?>
<?xml-stylesheet type="text/xsl" href="configuration.xsl"?>
<configuration>
  <property>
    <name>mapreduce.framework.name</name>
    <value>yarn</value>
  </property>
</configuration>
After all, you should start hdfs and yarn service.
$ cd /usr/local/hadoop/sbin
$ ./start-all.sh
Running AutoFlow job
Different from the example above, in hear you should specify parameters like db_type, db_params, store_path,
file_system, file_system_params in autoflow.estimator.base.AutoFlowEstimator .
Note
Detailed explanation can be found in autoflow.estimator.base.AutoFlowEstimator
trained_pipeline = AutoFlowClassifier(
    initial_runs=5, run_limit=10, n_jobs=3,
    included_classifiers=["lightgbm"],
    should_store_intermediate_result=True,
    db_type="postgresql",
    db_params={
        "user": "tqc",
        "host": "0.0.0.0",
        "port": 5432
    },
    store_path="/autoflow",
    file_system="hdfs",
    file_system_params={
        "url": "http://0.0.0.0:50070",
        "user": "tqc"
    }
)